Tuesday, July 19, 2011

Stuffed shirts.

One last post to show you what I've made in preparation for my demonstration on Thursday night.  3 cushions covers made from men's shirts.  


The circle cushions are both (obviously) made from old button up/collared shirts.  The square one is made from an old polo that husby was throwing out.  I almost stopped breathing when I started to cut into that Ralph Lauren shirt (top left), but my dad assured me he would never wear it again and I could cut into it.  

I did my first button hole on the square cushion cover!!  It took me a good 20 mins to figure out how to even attach the appropriate foot on the sewing machine, but I got there in the end.  I probably could have made the hole a little smaller, but I am nonetheless pleased with my effort.  

I'll have to remember to take photos on Thursday night of all my demo items and display.  Husby also mentioned that he thinks the round cushions looks like old mens round bellies, and I have to agree.  Funny!  See ya!

Christy

Sunday, July 17, 2011

A quick table display.

Once again, in preparation for my demonstration this week, I have something to share.  Today at church I was asked to do a table display promoting the upcoming activity this week.  I am really annoyed at myself that I didn't think to take a picture of my little display, but I didn't want you to miss out so I ended up setting it up at home to take a photo for you.  It looked great and I got lots of compliments from people who were looking forward to what I was going to demonstrate at the activity.   


And here are closeup's of all the elements.


That is the table runner that I told you about earlier in the week.  I just used some scrap fabric to tie around the vase, and spray painted some sticks with red & silver spray paint.


My first attempt at bunting!! I just chose some scrap fabrics that co-ordinated with the table runner and whipped it up in under an hour.  I am super pleased with it and will be making some again soon because it was so simple!

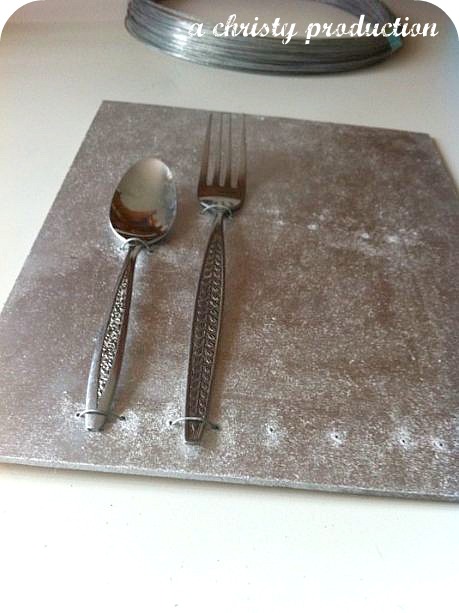
And then for the cutlery frame.  This one took a little more work.  I just painted a thrifted frame black.  Then I traced my cutlery placement on the frame backing, and drilled some nice narrow holes using the husby's electric drill.  


Next was to spray paint the wood.  I did it silver, but I think if I did it again I would use a more contrasting colour.  White, green, blue or red were some of husby's suggestions.  Next time!


I am happy how it turned out regardless!
I still have a couple of things to show you.  Hopefully I'll have some time this week to share it.  

TOPIC CHANGE!!  I am moving!!  Our lease is up next month and we are moving in with my parents for a year to save money towards buying a house.  So I am already madly going through the house deciding what to do with all of our stuff!!!  Some we are already attempting to sell, others we are putting aside to sell at the local car boot sale early next month.  Then I need to start looking at what do we put away in boxes for a year, and what will we still use while living at mum and dads.  We are going to have ALOT less room, so I need to be brutal and part with alot of our possessions.  Alot of the older electrical appliances will be going, a few bits of furniture, including our couch!  It's gonna be fun!


Christy

Decorative Balls - Christy style!

This is something I've been working on in my spare moment over the past week.  I am super happy with the outcome - better then what I had anticipated, and a hell of a lot cheaper then what is available in the stores.  And let's be honest, the ones in the store are nowhere near as funky as these!!

  Although this is a new addition to my dining room table, I actually made it to show at the class/demonstration I am doing this upcoming week on how to decorate your house on the cheap, or using what you have at home, at an activity my church is putting on.  I googled "homemade deco balls" and sifted through tonnes of great ideas, and this is what I put together.


Took the piccie late at night on my phone (lazy), so you can't see the full effect of how amazing it is.  BUT here is all the balls laid out so you can see all the different colours and textures and sizes.
They were all easy to make.  Some fiddlier then others, but only because I kept getting my fingers stuck in the glue!  I used a mixtures of polystyrene & plastic golf balls to make all of my pretty balls.  Here's what I did:
  • Thumbtack balls - you just go around once through the centre of the ball, and then continue on overlapping each layer slowly.  Just keep going around and around until everything is covered.  I found it necessary to put a little hot glue under the last few tacks to keep it all secure.  Then I spray painted them.  That took forever!  They needed about 3 coats on each side.  I think they sat outside being sprayed for about 4 days!
  • Lentil balls - just bought a few bags of 'soup mix' lentils and picked out the two shapes and sizes I liked best.  Luckily one of the beans was already green so I just hot glued them down and was happy with the colour and left them.  Nice and easy!  The other I just glued down and then spray painted white.  After that dried I watered down some green paint and went over them - which gives it a rustic look.  Really happy with those balls.
  • String balls - the fiddliest of all.  I just did a knot in the string and used a pin to secure it at the beginning.  Then just put a little bit of hot glue down and just keep going around and around.  Super annoying if you have fat fingers like me!
  • Fabric balls - I did a couple of different techniques with these.  Some I cut up little chunks and decoupaged them with white glue.  Others I cut strips and used pins to secure the ends.
I love how they turned out.  Now I just need to demonstrate all these techniques to these women along with all the other things I want to demonstrate in 10 mins.  Should be interesting.....
One last thing.  A good friend of mine has launched her store in Madeit.  Pop on over and check out her amazing talent!


Christy