Showing posts with label fabric. Show all posts

Tuesday, December 17, 2013

DIY Minion Softies

Earlier in the year when the second Despicable Me movie was released, naturally my niece (4) and my nephew (6) fell in love with the characters all over again. I have a bit of a history of softie making for my nephew (and trust me alot of the toys are DODGY) but he loves all of them regardless of how they turned out. 

Not long after the movie was released it dawned on my nephew that I could make him a minion softie. He begged and begged, and knowing it would not be an easy task I kept putting him off and telling him I was too busy hoping he would forget, but of course, he did not. It didn't take long before my niece caught onto this and of course she wanted one too. So a few months ago I thought, what the heck, I'll make minions for Christmas. 

I scoured the internet for softie patterns because my history of toy patterns is far from polished. I came across this AWESOMELY great tutorial and based my creations off of it!

For the hair I found this neat wool at Lincraft that was all curly and knobbly looking. I threaded it through on the tops of their heads and knotted the strands into place. I think they look neat!


Mr 6's name starts with an S and Miss 4's name starts with a B so I wanted to make sure their minions were personalised so that there could be no arguments or confusion as to which minion belonged to who. So that is how the idea of the little logo got changed to the blue & pink letters on the overalls! At the end when I was adding the buttons it only seemed natural to match them to the letters and I love how they look!


And then it dawned on me there are different kinds of minions! So I was able to adjust the pattern and made the both the shorter two eyed minion and the taller one eyed minion (I have NO idea what their names are???). 


I decided to put in a lot of effort into making small, close stitches to make sure each element was ridiculously secure. I know the way  my niece and nephew play and careful and delicate is not their forte! It took me a long time to get all the elements completed but I think that gives the minions an overall more polished appearance which I'm pleased with.


The mouth's. That is always my least favourite part to tackle on any softie. More times than not they just look weird. I'm so pleased both mouth's turned out on these. It was one major "PHEW" from me!


And here are the finished products. Don't they look great? I know they will be happily received and loved on Christmas morning.

Have you made any Christmas presents this year? I'd love to hear about your creations.

Christy

Friday, December 13, 2013

Ruffle Tree Skirt

Look at my Christmas ruffle tree skirt!! I am so excited that I finished it!! It took me 4 days to complete from start to finish. I based the skirt off of this tutorial


I made my base slightly larger because I have a large Christmas tree. If I recall correctly I did it 50 inches in diameter. The only fabric I could find in my stash big enough to make the base all one piece of fabric was a soft pink fabric. At the time I thought it wouldn't matter cause you wouldn't see it. I was wrong.


The ruffles are so full and delicious that they stick up, revealing my ghastly pink mistake. I have decided to just get over it and deal with it. I thought I might tack down some of the bulkier ruffles to hide the pink but by the time I finished the skirt I just couldn't be bothered!! Maybe it will bother me another year and I'll do it? Maybe not... 


When I was sewing on the last row of ruffles hubby asked me if I'd checked that all the fabrics I had chosen matched the tree ornaments. I hadn't. And for a moment there I doubted my matching skills. But I had nothing to worry about. It matches perfectly with our colour scheme & my mismatched, eclectic style.


It feels wonderful to have ticked off one of my biggest Christmas craft projects EVER!! And I get to enjoy it for years and years to come! Now onto gift wrapping & my Christmas tree!


This year I went with super dooper simple gift wrapping. Who doesn't love brown paper? And hemp twine? And Kraft boxes? If you answered no to any of those questions, then you need to change your ways, because they are amazing!! The Kraft boxes are Stampin' Up! beauties. The larger boxes are found in the Seasonal Catalogue and they are $6.95 for a pack of 3 boxes (#132147) and the smaller boxes are found in the main catalogue and they are $4.95 for for a pack of 4 boxes (#124106). You can read more about the boxes here. I found an idea a few years ago to just use monogram tags to label Christmas gifts and this year I got around to doing it! Every member of my family has a different coloured letter to match in with the beautiful Christmas colours. I love how it has turned out. To make them I just punched out a 2-1/2" circle (#120906) out of Very Vanilla cardstock (#103550) and then cut out the letter I needed through the Big Shot (#113439) using the Typeset Alphabet Bigz Dies (#127553).

Now to finish the 4 other projects I have started and not yet finished..... In the meantime, here are some of my favourite tree ornaments!!


Merry Christmas!


Christy

Thursday, October 13, 2011

#13 - Online Garage Sale

In the area I live in, some really smart intelligent person has made an Online Garage Sale Group on Facebook.  It's awesome!! Just the other day I bought about 100m of ribbon and ric rac.  I was so pleased that I thought, why don't I sell crafty stuff on here that I don't need/want/use anymore too!  So that is what I have done today.


And I also went through my remnants and put together a big bundle.


I actually sold the remnants within 10 minutes of posting them on the site.  Woohoo!!  I have sold a few other things on there too.  A lady just came and picked up something and handed over some cash.  I quite like it.  Every town should have an Online Garage Sale!! 


Christy

Tuesday, September 6, 2011

A sneak of our new place...

We have been moved into our new place (upstairs at mum and dads) for a few weeks now.  Over the weekend, we FINISHED unpacking, putting together, finding places for our storage items, and cleaned up!  I am so happy it is all done.  I am loving the space that I am continued to be blessed with for my crafts.


I now store my hairdressing supplies in my craft room, which is new, but I found those great black and white drawers which fits everything in perfectly.  I also have to put my filing cabinet under the desk, but I still have plenty of room.  I also have a window right next to the desk which is lovely for fresh air and sunshine.  In my old craft room, I never ever got sunlight!

Everything is still packed into my cube shelving and white drawers.  And there is that beautiful sunlight I was talking about.  


Waste not want not!!!  I am planning to measure up the top of these drawers so I can have some wood cut which will give me another space to maybe store something, or put something decorative.  I actually use scraps for 50% of my sewing projects.  You'd be surprised what you can make with them!


And a couple of my personal touches.  My Texan corner (hubby is Texan).  All that is missing is something with the Texan flag.  Maybe a project for the future!


My awesome plaque at the door of my room.  My sister got it for me for Christmas.  I love it!

And then there's the lounge room.  In moving in, we had to sell our couch as my parents had a few up in the lounge upstairs.  They're not the most gorgeous couches, but I'm trying to make do with what we've been provided with.


The couches are a little uncomfy, so I have plans to make a few more cushions so that I can lounge more comfortably!!  We also got rid of our coffee table because mum has an antique blanket box that had nowhere to live so we are using that as our coffee table.  I was worried about the top of it getting damaged so I made a topper.  Just a piece of chipboard cut to size, and covered with some nice tough fabric.  And then a piece of felt adhered. to the base so the staples don't scratch up the top of the box.  Not too bad I say!
There's isn't much else to show at this stage.  Husby's study is also the storage room, so his desk has boxes stacked up, our dining room set disassembled and stacked up.  Not the prettiest room.  And then our bedroom.... STUFFED with furniture.  Not pretty, but practical.  

It's time to start adding the little touches that make a home.  Thanks to Pinterest I have plenty of ideas!!  Now I just need to get started!!


Christy

Wednesday, August 31, 2011

Eager Beaver Bunting & a Button Hairclip.

I signed up for the Bunting Swap today.  I think I was excited, because I've already made my bunting!!!!!  I signed up to make 6.  


I wanted the colours, and patterns to work together in a funky way, and I wanted to use doilies.  


Originally I was going to do the traditional triangular bunting, but thought I'd mix it up a bit by basically cutting the bottom of the triangle off.  


I love they've turned out.


I also have attempted another funky hair clip.

I have started making another in black and white, and will probably keep on making other colours down the track.  I just love how they look!!!


Christy

Tuesday, July 19, 2011

Stuffed shirts.

One last post to show you what I've made in preparation for my demonstration on Thursday night.  3 cushions covers made from men's shirts.  


The circle cushions are both (obviously) made from old button up/collared shirts.  The square one is made from an old polo that husby was throwing out.  I almost stopped breathing when I started to cut into that Ralph Lauren shirt (top left), but my dad assured me he would never wear it again and I could cut into it.  

I did my first button hole on the square cushion cover!!  It took me a good 20 mins to figure out how to even attach the appropriate foot on the sewing machine, but I got there in the end.  I probably could have made the hole a little smaller, but I am nonetheless pleased with my effort.  

I'll have to remember to take photos on Thursday night of all my demo items and display.  Husby also mentioned that he thinks the round cushions looks like old mens round bellies, and I have to agree.  Funny!  See ya!

Christy

Tuesday, June 28, 2011

Bad blogger.

I have been slack and selfish.  I have been reading lots of blogs, finding new talented people to follow, taking note of their fabulous ideas, and not bothering to return the favour with producing regular eye candy on my blog haha!!  My apologies.  My attitude stinks towards anything that requires effort due to my ongoing health issues.  Poor health really does mess with you... sigh.

BUT onto brighter and happier things.  I have stuff to show you!

I made my husband some house shorts!  I was bored, and just went and got a pair of his basketball shorts out of his drawer, traced around them, and hoped for the best hahaha!!  They turned out pretty good considering.  After I finished sewing them (and after many a sigh and unpick and grunt) I had husby try them on and they only needed minor adjustments.  He's worn them pretty much every night since.  They're pretty funny if you ask me though!

(apologies for all the photos, they were taken on my phone as I seem to have temporarily misplaced my camera)
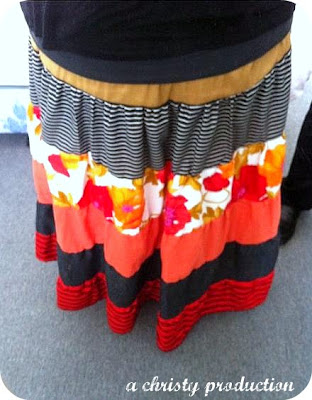
Then over the weekend I didn't have much on, so had a go at making another patchwork gypsy skirt.  I love how it turned out, even though I had a different idea in mind originally.  


I was able to overlock/serge all the edges before sewing my panels together.  After much grunting and sighing and unpicking, I was pleased that it came together nicely.  On a side not, I noticed something while I was cutting up my panels if fabric.  It was the writing on my selvage of the floral fabric.  It is cut off a little so isn't 100% clear, but I consulted my Facebook friends and they came up with a few other suggestions.....


I see "Fabric for Satan".  I laughed and laughed when I saw it.  Other suggestions were "Fabric by Sotan", "Fabric for Sotex".  I decided I'd stick with Satan for the entertainment factor.  What do you see??  

I had plenty of scraps and thought to make a nice headband to match also.

  
I was at my sisters house the other day and my sister insisted on practising her face painting skills on me.  I thought I'd show you for entertainment factor.  She asked why I wasn't terribly enthused.  My response was that it might have something to do with the fact that I am an adult....
And lastly, I have been doing some hairdressing jobs lately and have a nice bundle of cash waiting for me to spend on crafty goodness!!  I have been putting together a delicious Stampin Up order of punches and stamps... I can't wait!!
  
Until next time!

Christy

Friday, April 22, 2011

What I got up to today...

I loved today.  The first of our 5 day long weekend.  Let me step you through my productive, relaxing & enjoyable day.

6:00am - Woke up, looked at the time, said hell no, rolled over and went back to sleep :)

8:30am - Got up, got dressed, went into husby's study and joined in talking on the webcam to his family (who live in Texas)

10:00am - Started making some paper flower embellishments for my shop whilst still chatting with the husby's family... I'll list them soon.


11.30am - Realised how late it was and finished up our conversation with husby's family, headed downstairs and had something to eat

12 noon - Watched "Megamind" - which was surprisingly hilarious.  Would definitely recommend it.

1:30pm - Cleaned the kitchen and made a Shortbread cookie dough - and popped it in the fridge.

2:00pm - Started doing something I've wanted to do since we moved in 1 1/2 years ago.  Scrubbed the exterior of ALL the doors and drawers in my kitchen.  They were dirty when we moved in!!  Gross I know, but because it was on the outside it didn't bother me so much after a while!!  

3:30pm - Made Chocolate Mousse for dessert :)


4:00pm - Started rolling, cutting out and baking the shortbread.  I also watched another DVD whilst baking - which is why it took me so long to make the cookies....  I watched a movie that I already can't remember the name of.. BLAST!

Anyway, I am a self confessed cookie burner.  I have tried a few times in the past few months to conquer cookies, and not burn them.  Here's how they turned out.


5:30pm - Made dinner with husby.  It was delicious.  Steaks cooked on the BBQ, eggs, bacon, tomato & onion & a couple of chips.  Not exactly WW friendly.. but it's Easter!!  It will be a weekend of delicious foods here and there.  We ate on the couch and watched ANOTHER DVD!!  Sorcerer's Apprentice I think it was.  It was OK.  Few things were unfinished in the movie.. but I'll get over it :)

8:30pm - Cleaned up kitchen and came upstairs, and cleaned my craft room... to a certain degree.  A friend recently moved to the other side of the country and offered me a few bags of fabrics she no longer wanted.  I of course accepted :)  But am yet to unpack it all and find hangers to put it on and put in my wardrobe.  Maybe tomorrow???


9:00pm - Discover cookie dough in my rings and feel ill

9:15pm - Listen to my new Josh Groban CD... and work on a few more flowers. 


Can't wait to see what tomorrow brings.  Don't you just love Public Holidays!!!

What did you get up to today?


Christy

Thursday, April 21, 2011

Just a quick post to share a great giveaway..

Adrianne over at Little Bluebell has a great giveaway running - just wanted to share so you could enter aswell!  I don't often post about giveaways anymore, but this one is great!

Pop over here if you want to win this...


Good luck!
Christy