Monday, February 3, 2014

Catalogue Launch Party Part 1 - the setup!

To read about Part 2 - the food table, click here
To read about Part 3 - the display projects, click here.

Last Thursday night we had our Mini Catalogue & Sale-a-bration Launch Party. We had a lovely intimate group of ladies and the evening was filled with chatter, laughter, eating and lots of oohing and ahhing over the beautiful new products. I'm not going to bore you with too many details. Instead I'll let you experience the night as we did, through pictures. This first blog instalment is filled with the big display table set up, our main table set up and a closer look at the chocker block of goodies in the lucky door prize.

More blog posts with close up's of all the display cards & projects, and the tasty colour co-ordinated food table will be posted later in the week.   

Enjoy! 


Christy

Tuesday, January 28, 2014

NEW Mini Occasions Catalogue + Sale-a-bration time has begun!


The NEW Mini Occasions Catalogue is finally here! I have been talking about it's arrival for a little while now and have been showing you lots and lots of sneak peeks of new products. You are now able to view it online here, or contact me to get your hands on a paper copy of it for just a couple of dollars (available Australia wide). The Mini Occasions Catalogue will be with us until 30th June 2014.


Today also marks the beginning of this year's Sale-a-bration (SAB). This is my favourite time of year because of all the freebies. The basic run down of SAB is:
  •  for every $90 you spend, you can choose a free product from the SAB catalogue (13 things to choose from).
  • if you host a party in your home, as the hostess you earn an extra $50 hostess dollars on TOP of your regular hostess dollars if your party sales are $500 and over, so you could potentially have up to $250 hostess dollars (mind blowing). 
  • if you choose to join Stampin' Up! during SAB you'll save yourself $65 and only pay $169.
You can view the SAB catalogue here.


To celebrate the commencement of SAB and the beautiful new Mini Catty I am holding a Catalogue Launch Party at my home on Thursday evening. As well as being able to dabble in and enjoy the new Stampin' Up! goods my cousin will be there to run some games with us and demonstrate some of the beautiful Scentsy products. So it will be a fun, mixed themed night. Full details on my Facebook Events page


Christy

Wednesday, January 22, 2014

My Cream & Gold Christmas Table Setting


I just LOVE neutral table settings. There is something magical about it so it was easy for me to settle on Cream & Gold (with other neutral tones thrown in) for the big family Christmas lunch (which we had on Boxing Day). 


For the most part I was able to throw this table setting together using what I had at home. The only things I needed to buy were the gold & cream bon bons (which were a headache to find) and the chocolate & white striped straws which I purchased from Lille Parti for a couple of dollars (which you can see a couple of photos down). 


I knew that I was going to have a busy display running down the centre of the table, so I chose to not make place setting cards. Instead I opted for these simple name tags to tie around the cutlery. I love the way it brings a rustic feel to the place setting. 


For drinks we each had a wine glass jazzed up with a twine bow, and a glass bottle for water, decorated with a sweet mini paper doily, a brown cardstock circle, white & gold baker's twine and a mini punchie with "merry" on it. Majorly cute and everyone commented on how lovely the bottles looked. It is such a easy and cheap way to dress up a boring bottle instead of using a regular water glass.


For my table decorations, I simply ran a roll of burlap down the centre over the top of my calico tablecloth. Then I placed my trusty mini logs & spray painted pine cones all over which I had made for my Thanksgiving lunch which you can recap on over here. I just collected whatever I could find around the house that was neutral toned and whacked it on the table too! It really was nothing fancy! 


Here is one of my reindeer animals! I made a whole bunch of these and showed them on my FB page, you can see all of them over here. (I also blogged about them when I first found the idea here). They were a fun talking point over lunch! 


The last little detail on the main dining table was my big paper doily under the dinner plates! This idea came to me as I was pulling out the mini doilies for the glass bottles. I saw my packet of large ones there and the idea truck! I love how it looks! Love me some doilies! 

Now onto the glorious FOOD!! 


I made up some matching food signs for over on the food table. I know how much I like it when I know what food I am piling onto my plate so I am loving using food signs at all events these days. They are super easy and cheap to make. I just used cardstock, chocolate & white baker's twine, I punched out some ornaments out of my glimmery gold cardstock and threw on a large pearl to glam it up a little. 

The foods we enjoyed for lunch were Rice Salad, Mango Avocado Salad, Ambrosia Salad, Turkey, Ham, Garlic Prawns & Cranberry Sauce.


This was my layout for the food table. I set it up on mums buffet in the dining room right near the table. I threw on a lovely vintage cream lacey tablecloth, a burlap runner and a couple of decorations. The white stands are candle holders from Ikea. They come in handy ALOT. 

And here is all the glorious food! We sure did enjoy it! Can't wait until next year so we can eat it all again!


 And the moral of the story is, if you need food signs, place settings, bottle decorating or any other papercrafting related goods to style your party, we are ready to help you! We can customise everything to suit your needs, your colour scheme, your theme and your tastes all for a reasonable price! Please don't hesitate to contact me if you have any questions!


Christy

Wednesday, January 15, 2014

Christmas Day (throw together) Lunch Table


I know I'm late with my Christmas posts but here they are. As ridiculous as it sounds because it feels like Christmas was month's ago, this post is actually only 2 and a bit weeks late. So it's not THAT bad. 


Christmas last year was a little different from normal. We had a really quiet Christmas Day at Mum & Dad's with a few extra friends over for lunch. I hadn't thought of making a nice table setting for lunch and was making salads in the kitchen when I saw the dismal Christmas table setting being put together by my Mum (she's not known for her decorating skills). I quickly finished up in the kitchen and threw together a few things on the table to dress it up a little and to try and make her ghastly green tablecloth look like it was meant to be there (I love green and even I don't like that thing). 


Doesn't a little bit of string tied in a bow around a wine glass (or is it a champers glass? I have no idea...) look so elegant? It's my new favourite decorating thing to do. Now all those bits and pieces were NOT from my parent's house. Oh no. I brought over 8 boxes of MY bits and pieces from my house over to hers for decorating purposes. There was a main reason I brought it all over but you will have to wait a few more days before I show you that one! :) 


For lunch we enjoyed Mango Macadamia Salad, Garlic Chilli Prawn Skewers, freshly cut ham off the bone, chicken thighs (for people like ME who hate seafood) and Coleslaw. Nice, simple, tasty, fresh & light! 


Man I could do with a slice of that ham right about now. Nom nom nom!! 

My BIG Christmas table project will be revealed later in the week. You better be ready for it, it's fairly AMAZING. 

Christy

Wednesday, January 8, 2014

"Best of" Brides & Babies

Each month Stampin' Up! has been releasing a "Best of" stamp set to celebrate the 25 glorious years it this great company has been around for!! This month's "Best of" stamp set is "Brides & Babies".


It is available for purchase until 30 April 2014. Just $25.95 and it comes in Clearmount only. Contact me to order a set! 

Christy

Monday, January 6, 2014

Book a Sale-a-bration Workshop


First and foremost, do you know what Sale-a-bration is? If you don't, here is the run down. 

It is a once a year promotion and is by the far the most fun & rewarding promotion each year put on my Stampin' Up! You can earn FREE Sale-a-bration (SAB) gifts when you spend $90 on any Stampin' Up! items. 


So don't miss the key word here. For EVERY $90 you spend you get a free gift. So if your total hits $180, you get to choose 2 gifts, if it hits $270 you get to choose 3 gifts, and so on. 

This year there are 13 beautiful items to choose from which I can't show you yet! But I will tell you that as usual there is a fabulous co-ordinating product bundle of a stamp set, DSP, accessory pack & embossing folder as well as a few other stamp sets, a card kit, a beautiful co-ordinating punch which you will LOVE, treat kit, banner kit & digital ensembles to choose from. 

One of the things I love about SAB is it rewards you in all areas, whether you are a customer, hostess or if you decide to join up as a demonstrator. 

If you have a SAB party and your workshop sales are above $500 you will receive a BONUS $50 hostess dollars on TOP of your regular hostess dollars. Here's the break down: 


So if you have sales of $500 at your party you will have a total of $130 hostess dollars to spend on whatever you like instead of just $80. Pretty amazing right? 

And as always, there is a fabulous incentive to join the Stampin' Up! family during SAB. Normally it costs $235 to join up but during SAB if you join up it will only cost you $169. Pretty amazing saving so you can spend more on the goodies you have on your wishlist. With the sign up kit you are able to choose $305 worth of products!! So you are almost getting a 50% off package really. And don't forget once you have signed up you are entitled to a 20% discount on products, you will earn a little extra cash and will be provided with beautiful & endless ideas. 

I hear you asking WHEN SAB BEGINS!!! This year they have decided to extend how long SAB runs. It will start on 28th January and will run through to 31st March. 

Here is the fun part. 


If you book a SAB Workshop with A Christy Production to be held within the SAB period you will receive a free tub of Antique Brads! Spaces are limited so don't delay in getting in contact with me to book in your Workshop! Hosting a Workshop is EASY! Just set a date, invite some friends, and provide your guests with some snacks and I will do the rest for you! 

Talk soon xo


Christy

Friday, January 3, 2014

Sketch Layout Challenge #3 - using the brayer

Our last challenge we did over a longer period of time with it being Christmas/New Year and the busyness that comes along. The challenge was issued early December and here it is.


Alicia was our challenge chooser this time round and she threw in the added challenge of using our Brayer somewhere in the project!! 

Brayer #102395 $21.95
Not everyone in our group owns a Brayer so those who didn't just did the layout challenge alone. It was a tricky one but I love what everyone came up with. 


Alicia had fun with the design and decided once she had her idea she would make several designs to use up some of her Sale-a-bration (SAB) DSP from last year. Here is how she used the Brayer in her design:
- run plain cardstock through Vine Street Embossing Folder (last years SAB)
- ink up Brayer with Versa Mark (#102283) clear ink and run over the raised surface of the embossed cardstock
- sprinkle with Clear Embossing Powder (#109130) & heat set with Heat Tool (#129056)

They look bright and cheery & fun! 


Next up is Kymberly's designs. She has just recently joined up as a Demonstrator (woohoo!) and doesn't have as big of a stash as she wishes and didn't have a Brayer so she had fun with the layout challenge and played around with some of her gorgeous DSP. I love both these designs. They're clean, matched well, and uncomplicated. Nice job Kymbo!


Next is Ingrid from Inky Ingrid. She was the first to complete the challenge back in December and came up with this gorgeous design. Here is how she made it: 
- cut a piece of gloss paper and "mask" your sun 
- ink up the Brayer with Marina Mist Ink (#126962) and roll it from the top down until you're happy with the blue colouring
- then ink up the Brayer with Sahara Sand Ink (#126976) and roll again but from the bottom up
- remove post it note and sponge using various yellow and orange inks to get the effect you desire for the sun. 
- stamp your image using Staz On Ink (#101406) and sponge edges also.


Rochelle from Lille Parti came up with two Christmas designs for this challenge. The first card she used her Brayer on the embossed strip of card stock to apply Versa Mark Ink (#102283) and then heat set Iridescent Ice Emboss Powder (#101930). It looks just like snowflakes! 

The second card is a little more simplistic and the Brayer was used to colour the a Tea Lace Paper Doily (#129399) with green ink! I love both designs! 


And this is my design! I decided to let my Facebook followers decide my colour combo just for fun! The first combo given to me was Tangerine Tango, Tempting Turquoise, Rich Razzleberry & Whisper White. Tricky combo if you ask me! But it didn't turn out too bad afterall. I will admit there were a fair few attempts that failed before this one though!! This is how I used my brayer:
- open up the Beautifully Baroque Embossing Folder (#130917)
- ink up my Brayer with Rich Razzleberry ink (#126950)
- roll the ink over the inside of the embossing folder
- put a piece of paper inside embossing folder, close it, and rub your hands across the folder with your hands evenly all over.

Can't wait for our next challenge! Let me know if you'd like to join in!


Go here & here to see previous challenges.


Christy

Wednesday, January 1, 2014

Tutorial: How to schedule posts on Facebook Pages

A lot of small businesses now use Facebook to set up a Page. It's a fantastic tool Facebook has provided to help people have an online, social media presence for free. One of the fantastic features of Facebook Pages is the schedule post's option. I am someone who likes to investigate new features as they appear and try to learn and understand how they work. At first I wasn't thrilled with scheduling, but my opinion has since changed now that I understand how it works better. Here is a basic run down of how it works so that you can try using it on your Facebook Page. 


First things first, you need to decide if you want to schedule a Status, or a Photo/Video. This process works the same regardless of what you select. In this instance I have chosen to just schedule a good morning status for tomorrow morning. So just type in your content and add your photo/video as you normally would. 

Just a little bit of information about content & reach. The algorithms of Facebook are always changing. Previously you would have excellent reach with status posts, and the reach on photo uploads, or if you were to share a link, was horrible. Without boring you with the details Facebook is beginning to change this around. You may have noticed already (I know I have) but photo's and links are achieving better organic reach. A tip that was given by a FB marketing guru was to post 2 photos instead of 1. I have been experimenting with this and have been pleased with the results thus far. Maybe you could give it a go too! 

Ok sorry, back to scheduling. So type in your text and add your photo or video as you normally would. BUT! Do not hit post. This is where you do something differently. 


Under your status bar in the left hand corner is a small blue clock. Click on that clock and it will open up your scheduling options. 


First, select the date you want to schedule your post for by clicking on the little red & white calendar icon which is next to today's date. You can schedule for later in the day, the next day, next week, next month or next year!! In this instance I selected for the next day. 


Next you need to click on "Add a Time" to the right of the date selector. Just start typing in the time you have in mind and it will pop up with some options for you. You can select from the options, or if you wish you can type them all in yourself. 

Then hit SCHEDULE. 


Once you have successfully scheduled your post, this window will popup on your screen. It recaps the scheduling information for you to do a post scheduling check up to make sure you've selected the correct time & date. If you need to adjust the time or date, just click on "View Activity Log" and your post will be there. There is a drop down menu in the same box as the post and you can select to edit or delete the scheduled post. 

You can see in the bottom left corner "Schedule another post". Go ahead and click there if you have several posts you are ready to schedule ahead of time.


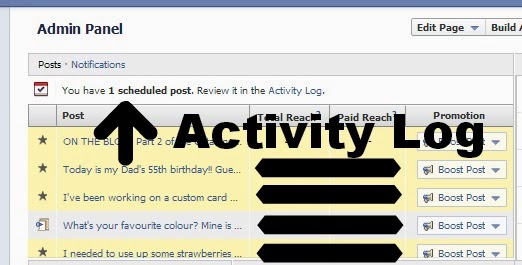
After you have finished scheduling, if you would like to look back over your posts, or you need to edit them after exiting out of the popup message pictured above, you can access them through your Admin Panel. It is right at the top so you will be able to find it easily. Just go into Activity Log and all your scheduled posts will be there. 

NOTE: You can schedule posts from Android & Apple devices also. You just need to download the Facebook Pages Manager App and you are good to go. Once you type in your status and added in your photo, once again just click on the little clock icon, and select the date & time you wish to post. 

I hope this has been helpful! Just for fun, come join in on the crafty fun on my Facebook page. 

Christy