Showing posts with label tutorial. Show all posts

Wednesday, January 1, 2014

Tutorial: How to schedule posts on Facebook Pages

A lot of small businesses now use Facebook to set up a Page. It's a fantastic tool Facebook has provided to help people have an online, social media presence for free. One of the fantastic features of Facebook Pages is the schedule post's option. I am someone who likes to investigate new features as they appear and try to learn and understand how they work. At first I wasn't thrilled with scheduling, but my opinion has since changed now that I understand how it works better. Here is a basic run down of how it works so that you can try using it on your Facebook Page. 


First things first, you need to decide if you want to schedule a Status, or a Photo/Video. This process works the same regardless of what you select. In this instance I have chosen to just schedule a good morning status for tomorrow morning. So just type in your content and add your photo/video as you normally would. 

Just a little bit of information about content & reach. The algorithms of Facebook are always changing. Previously you would have excellent reach with status posts, and the reach on photo uploads, or if you were to share a link, was horrible. Without boring you with the details Facebook is beginning to change this around. You may have noticed already (I know I have) but photo's and links are achieving better organic reach. A tip that was given by a FB marketing guru was to post 2 photos instead of 1. I have been experimenting with this and have been pleased with the results thus far. Maybe you could give it a go too! 

Ok sorry, back to scheduling. So type in your text and add your photo or video as you normally would. BUT! Do not hit post. This is where you do something differently. 


Under your status bar in the left hand corner is a small blue clock. Click on that clock and it will open up your scheduling options. 


First, select the date you want to schedule your post for by clicking on the little red & white calendar icon which is next to today's date. You can schedule for later in the day, the next day, next week, next month or next year!! In this instance I selected for the next day. 


Next you need to click on "Add a Time" to the right of the date selector. Just start typing in the time you have in mind and it will pop up with some options for you. You can select from the options, or if you wish you can type them all in yourself. 

Then hit SCHEDULE. 


Once you have successfully scheduled your post, this window will popup on your screen. It recaps the scheduling information for you to do a post scheduling check up to make sure you've selected the correct time & date. If you need to adjust the time or date, just click on "View Activity Log" and your post will be there. There is a drop down menu in the same box as the post and you can select to edit or delete the scheduled post. 

You can see in the bottom left corner "Schedule another post". Go ahead and click there if you have several posts you are ready to schedule ahead of time.


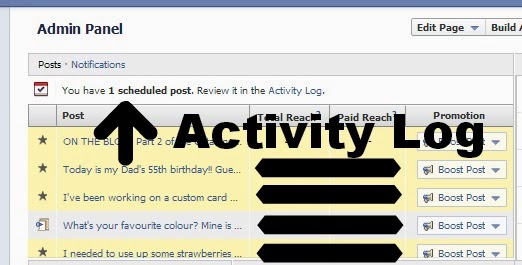
After you have finished scheduling, if you would like to look back over your posts, or you need to edit them after exiting out of the popup message pictured above, you can access them through your Admin Panel. It is right at the top so you will be able to find it easily. Just go into Activity Log and all your scheduled posts will be there. 

NOTE: You can schedule posts from Android & Apple devices also. You just need to download the Facebook Pages Manager App and you are good to go. Once you type in your status and added in your photo, once again just click on the little clock icon, and select the date & time you wish to post. 

I hope this has been helpful! Just for fun, come join in on the crafty fun on my Facebook page. 

Christy

Tuesday, December 17, 2013

DIY Minion Softies

Earlier in the year when the second Despicable Me movie was released, naturally my niece (4) and my nephew (6) fell in love with the characters all over again. I have a bit of a history of softie making for my nephew (and trust me alot of the toys are DODGY) but he loves all of them regardless of how they turned out. 

Not long after the movie was released it dawned on my nephew that I could make him a minion softie. He begged and begged, and knowing it would not be an easy task I kept putting him off and telling him I was too busy hoping he would forget, but of course, he did not. It didn't take long before my niece caught onto this and of course she wanted one too. So a few months ago I thought, what the heck, I'll make minions for Christmas. 

I scoured the internet for softie patterns because my history of toy patterns is far from polished. I came across this AWESOMELY great tutorial and based my creations off of it!

For the hair I found this neat wool at Lincraft that was all curly and knobbly looking. I threaded it through on the tops of their heads and knotted the strands into place. I think they look neat!


Mr 6's name starts with an S and Miss 4's name starts with a B so I wanted to make sure their minions were personalised so that there could be no arguments or confusion as to which minion belonged to who. So that is how the idea of the little logo got changed to the blue & pink letters on the overalls! At the end when I was adding the buttons it only seemed natural to match them to the letters and I love how they look!


And then it dawned on me there are different kinds of minions! So I was able to adjust the pattern and made the both the shorter two eyed minion and the taller one eyed minion (I have NO idea what their names are???). 


I decided to put in a lot of effort into making small, close stitches to make sure each element was ridiculously secure. I know the way  my niece and nephew play and careful and delicate is not their forte! It took me a long time to get all the elements completed but I think that gives the minions an overall more polished appearance which I'm pleased with.


The mouth's. That is always my least favourite part to tackle on any softie. More times than not they just look weird. I'm so pleased both mouth's turned out on these. It was one major "PHEW" from me!


And here are the finished products. Don't they look great? I know they will be happily received and loved on Christmas morning.

Have you made any Christmas presents this year? I'd love to hear about your creations.

Christy

Wednesday, September 11, 2013

Moulding Clay Tip!


We've all heard about the amazing new Simply Pressed Moulding Clay, & Clay Moulds right? 

I love the stuff. I love how easy it is to work with.  I love how the options are endless with what you can make out of the clay.  I love that I can make the clay any colour I want it to be.  I love that one small packet of clay never seems to run out.  I love those moulds, oh so much.  They are so sweet. 

But, there is one thing I do not love about Moulding Clay.  It takes at least 12 hours to dry.  

Recently I held a Workshop where everyone needed a large clay flower for their project.  Due to the drying time, it was necessary for me to pre-make everyone's clay flower beforehand. I needed 8 flowers, which meant I needed to get started making them about a week before the Workshop.  I had a plan to put clay in the mould each morning, and let it set during the day and overnight, and each morning, pop out the flower and put in new clay. I did this for two days... and then promptly forgot, until it was the day before my workshop.  I needed 6 more flowers! How was I going to make 6 flowers in 24 hours? Let me explain how.

Push your clay into the mould, and PUT IT IN THE FREEZER! Yep, you read right, the freezer. Leave it in for 30 mins, pull it out and quickly pop it out of the mould and then place it somewhere safe to dry. You have to remember to act quickly though. It literally freezes the clay, just enough, so that you can easily pop it out of the mould to complete it's drying process. If you don't pop it out of the mould straight away it starts to return to room temperature and will pick up your finger marks. 

I was able to make all 6 remaining flowers in a couple of hours, and they were dry, and ready to go for the Workshop on the next morning!

If you have a great Moulding Clay tip to share, I'd love to hear it!

To read more about some of the fun things you can do with Moulding Clay, go here.

Christy

Wednesday, August 28, 2013

Pearl & Rhinestone Makeover!

My favourite Stampin' Up! embellishments are the Pearl & Rhinestone jewels.  They are the perfect way to finish a project to give it that little extra something and a touch of bling.  


But sometimes, a white pearl, or a silver rhinestone just doesn't quite work.  Sometimes you want your little bit of bling, to be a specific colour to match in with your beautiful colour scheme.  Here's HOW you can do that!  

It's a simple recipe.  Crystal Effects (#101055) & re-inkers, in whichever colour you choose! 


I'm going to be Coastal Cabana-ing everything for this tutorial, so I put a drop of the re-inker (#131164) into my Crystal Effects on some waxy paper and mixed it in.  


And then you paint it on!  


Allow 12 hours for the Crystal Effects to dry and you have yourself a beautiful personalised jewel.  I love the subtleness of the pearls, but love how the shape of the rhinestone changes from the faceted surface, to a smooth rounded dome.  It gives the rhinestone a whole different look, but is still pretty and shiny like we want it to be on our projects.  

Which one is your favourite?  Mine is the large rhinestone!


Christy

Monday, August 26, 2013

DIY Coloured Brads


Have you heard of the new Candy Dot System? This is the replacement for the colour collection brads that retired with the last catalogue.  It's a much more versatile system and the best part is it is cheaper! But I'm not here to tell you about how wonderful the Candy Dots are (maybe another blog post?).  I want to show you a different, fun way to make your own coloured brads.


You need a couple of things to make these.  Firstly you'll need the Candy Dot Bases (#132293) which are only $4.95.  Next you need some re-inkers, in whichever colour you have.  If you don't have any, luckily enough they are $4.95 each too! And lastly, a bottle of trusty Crystal Effects (#101055)!


Ok, now to make these coloured brads.  Pick out a couple of brad bases.  You will need them to stand upright while you work with them and to dry, so I like to use a little moulding clay - but you could use blu-tack too.  The beauty of using the moulding clay, it is dries and you can hold onto them and re-use them every time you want to make these!


Next you will need to squeeze out a dollop of Crystal Effects onto some waxy paper.  On top of the CE, add a drop of re-inker.  

HINT: If you want the end result colour to be softer/lighter, don't add your ink directly onto the CE, drop it out onto another surface and transfer over a small amount of ink using a paintbrush.  


Mix the ink into the CE and you are ready to go.  Using a paintbrush, load up the tip with the tinted CE and dab it into the centre of the brad base.  Keep dabbing it onto the brad until there is an ice little dome of CE.  


As always, CE takes about 12 hours to dry, so carefully move the brads to a safe place to dry.  


If that isn't pretty enough for you, there is one last thing you can add... glitter!!  Once you have your coloured CE in the brad setting, just carefully sprinkle a little bit of Dazzling Diamonds Glitter (#102023) on top.


How sweet does it look?  

Oh boy, I'm loving Crystal Effects!!


Christy

Wednesday, August 21, 2013

DIY Page Pebbles

Hi everyone!! Here is my second installment of Crystal Effects embellishments.  If you missed the first post, you can find it here.  

Have you ever heard of page pebbles before?  They're pretty little decorative stickers, with a clear dome top that are used in crafting.  Stampin' Up! don't currently offer page pebbles in their catalogue, but that doesn't stop me from creating my own using the wonderful products that they DO have available in their catalogue!

First things first.  You will need a bottle of Crystal Effects (#101055).  


If you're not sure what or how CE works, my previous post explains it a little. You will also need Glue Dots (#103683).  Next time you use your glue dots, keep a little bit of the waxy paper so you can make these page pebbles. 


You can make page pebbles into any shape or size.  For this tutorial I used a regular hole punch, and then I used the Stampin' Up! 1/2" Circle Punch (#119869) and the Small Heart Punch (#117193). 


I punched out a couple of each using my Gingham Garden DSP (#129310). 


Using glue dots, I adhered my punchies down to my little strip of waxy paper.  On another larger piece of waxy paper, I squirted a little CE out and got my paintbrush out of my stationery holder. 


Next you need to dob the CE onto the DSP shapes.  Just don't go off the edges.  Make sure you pile it up on there as high and as best as you can.  


And then let them dry overnight!  It really is THAT easy.  


  A perfect edition to a crafting project!!


Christy

Monday, August 19, 2013

Moulding Clay + Crystal Effects = WOW!

Last week I attended a Downline Training meeting with my fellow Up & Downlines.  We get together every few months, and chat about what's going on, what's working for us in our businesses, what's not working, awesome new ideas, we share techniques using products, and give each other tips.  

I did a little demonstration on embellishments.  I started out with a few ideas in the beginning, but then the more I fiddled, the more things I came up with.  So over the next few blog posts, I'll be sharing these ideas with you! 

So! Moulding clay.  Do you know what this stuff is yet?  


The Simply Pressed system is new with our 2013-2014 catalogue and has been a huge hit straight off the bat. It's pretty versatile stuff.  The clay comes in a big package and it is white.  A nice blank canvas for you to have fun with.  The best & recommended way to colour your clay is using your Stampin' Reinkers.  Just a drop or so will do the trick! You firmly press the clay into the mould of your choice, level off the top, and let it dry!

It's a beautiful system and I think my favourite part about it is it is SO CHEAP.  A bag of clay is 68g, and only costs $11.95.  I have used mine so much, and you can't even tell that there is any missing from the packet!  The moulds come in the pack of two and they are only $13.95.  They're beautiful moulds too.  So you could have this system in your craft stash for just under $26.  Sounds pretty amazing to me! :)

So, moving onto Crystal Effects.  Have you heard of it before?


In a nutshell, you put this on top of... virtually anything, and it will give it a glossy, lacquered look.  It's very much a "how far can you stretch your imagination" type of product, but luckily for you, I've done alot of stretching and am going to share with you my discoveries. It is acid free and comes in a 60ml bottle (and it seems to last forever). 

Now, let's put these two products together, and see what we get!

First I started off with a large clay button, and a large clay flower.  I made both moulds quite a while ago, and they are both a bit dodgy. I rushed them and didn't press them into the moulds well enough.  But the dodgy ones are perfect for what we're about to do!

  
When using Crystal Effects (CE), personally I prefer to use it with a small paintbrush.  This way I have more control over how much I am dealing with at one time.  Sometimes, because it is so runny, it is difficult to have complete control over the flow out of the nozzle.  But everyone is different, so see how you go! I always squirt some out onto a scrap piece of waxy paper.

Using something sharp (I use my paper piercer) hold the flower steady while you apply a generous coat of CE.   


It will look gluggy, which is how you want it to look.


Now you can set this aside to dry.  CE takes at least 12 hours to dry (the only downside to it).  So if you want to do this for a project, you either have to think ahead, or be patient for it to dry before you can add it. 


But maybe a little bit of CE on a flower isn't fancy enough for you?  Have you ever heard the saying "when in doubt, add glitter" before? Well let me show you how you can. 

The first half is the same.  Use your piercing tool to keep your button steady while you apply the CE using your paintbrush.  Then comes the fun bit, using a spoon (or however you want to do it) sprinkle your button in Dazzling Diamonds Stampin' Glitter (#102023). I love this glitter because it is super fine, not all chunky and yucky like cheap glitter is.  Oh, and it literally shines like diamonds!  

  
Using my paintbrush again, with a little extra CE on the tip, I dabbed over the glitter, making sure it was stuck down, and also spreading out any little clusters of glitter so that my little button had even coverage. Oh, and make sure you try and get a little glitter on the sides too. Once again it is going to look like a gluggy mess, but it's ok, cause it will dry beautifully! 


Once it is dry, it looks A-M-A-Z-I-N-G! I'm beginning to wonder if I'll ever be able to use the moulding clay WITHOUT a touch of CE on the top!


So there you have it.  A really cheap, and easy way to jazz up some of your moulding clay embellishments.  If you'd like to learn more about the clay, clay moulds, crystal effects or any other Stampin' Up! products, please let me know.  If you would like to order some to have a play with yourself at home, we can organise it to be shipped directly to you in your home Australia wide, so don't rule yourself out if you don't live nearby.  That is the beauty of Stampin' Up!, I can help you wherever you are in Australia.  


Christy