Sunday, July 17, 2011

A quick table display.

Once again, in preparation for my demonstration this week, I have something to share.  Today at church I was asked to do a table display promoting the upcoming activity this week.  I am really annoyed at myself that I didn't think to take a picture of my little display, but I didn't want you to miss out so I ended up setting it up at home to take a photo for you.  It looked great and I got lots of compliments from people who were looking forward to what I was going to demonstrate at the activity.   


And here are closeup's of all the elements.


That is the table runner that I told you about earlier in the week.  I just used some scrap fabric to tie around the vase, and spray painted some sticks with red & silver spray paint.


My first attempt at bunting!! I just chose some scrap fabrics that co-ordinated with the table runner and whipped it up in under an hour.  I am super pleased with it and will be making some again soon because it was so simple!

And then for the cutlery frame.  This one took a little more work.  I just painted a thrifted frame black.  Then I traced my cutlery placement on the frame backing, and drilled some nice narrow holes using the husby's electric drill.  


Next was to spray paint the wood.  I did it silver, but I think if I did it again I would use a more contrasting colour.  White, green, blue or red were some of husby's suggestions.  Next time!
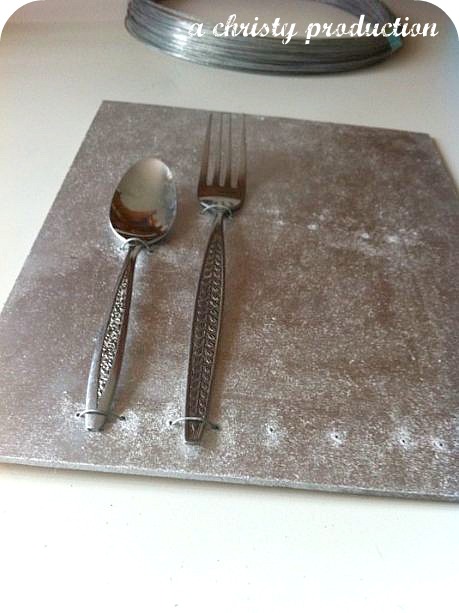


I am happy how it turned out regardless!
I still have a couple of things to show you.  Hopefully I'll have some time this week to share it.  

TOPIC CHANGE!!  I am moving!!  Our lease is up next month and we are moving in with my parents for a year to save money towards buying a house.  So I am already madly going through the house deciding what to do with all of our stuff!!!  Some we are already attempting to sell, others we are putting aside to sell at the local car boot sale early next month.  Then I need to start looking at what do we put away in boxes for a year, and what will we still use while living at mum and dads.  We are going to have ALOT less room, so I need to be brutal and part with alot of our possessions.  Alot of the older electrical appliances will be going, a few bits of furniture, including our couch!  It's gonna be fun!


Christy

Decorative Balls - Christy style!

This is something I've been working on in my spare moment over the past week.  I am super happy with the outcome - better then what I had anticipated, and a hell of a lot cheaper then what is available in the stores.  And let's be honest, the ones in the store are nowhere near as funky as these!!

  Although this is a new addition to my dining room table, I actually made it to show at the class/demonstration I am doing this upcoming week on how to decorate your house on the cheap, or using what you have at home, at an activity my church is putting on.  I googled "homemade deco balls" and sifted through tonnes of great ideas, and this is what I put together.


Took the piccie late at night on my phone (lazy), so you can't see the full effect of how amazing it is.  BUT here is all the balls laid out so you can see all the different colours and textures and sizes.
They were all easy to make.  Some fiddlier then others, but only because I kept getting my fingers stuck in the glue!  I used a mixtures of polystyrene & plastic golf balls to make all of my pretty balls.  Here's what I did:
  • Thumbtack balls - you just go around once through the centre of the ball, and then continue on overlapping each layer slowly.  Just keep going around and around until everything is covered.  I found it necessary to put a little hot glue under the last few tacks to keep it all secure.  Then I spray painted them.  That took forever!  They needed about 3 coats on each side.  I think they sat outside being sprayed for about 4 days!
  • Lentil balls - just bought a few bags of 'soup mix' lentils and picked out the two shapes and sizes I liked best.  Luckily one of the beans was already green so I just hot glued them down and was happy with the colour and left them.  Nice and easy!  The other I just glued down and then spray painted white.  After that dried I watered down some green paint and went over them - which gives it a rustic look.  Really happy with those balls.
  • String balls - the fiddliest of all.  I just did a knot in the string and used a pin to secure it at the beginning.  Then just put a little bit of hot glue down and just keep going around and around.  Super annoying if you have fat fingers like me!
  • Fabric balls - I did a couple of different techniques with these.  Some I cut up little chunks and decoupaged them with white glue.  Others I cut strips and used pins to secure the ends.
I love how they turned out.  Now I just need to demonstrate all these techniques to these women along with all the other things I want to demonstrate in 10 mins.  Should be interesting.....
One last thing.  A good friend of mine has launched her store in Madeit.  Pop on over and check out her amazing talent!


Christy

Monday, July 11, 2011

A new use for those old nasty ties!

I was in an Op Shop quite a while ago that was doing a HUGE cleanout of their stock and had their ties marked at $1.  I went to town!!!!  I think I bought about 10 or so.  Some were really fantastic.  So fantastic that I didn't get to keep all of them for my own upcycling use, because husby stole some!  I then put the word out amongst friends that when they do closet clean outs, to give me all their toss worthy items and I would see if I could use them or not.  Soon after a friend gave me a huge bag of old ties her husband has been meaning to toss for some time!  I was super excited. 

Now, I have been asked to do a demonstration at a womens church activity on how to decorate your home using the things you already have, or on the cheap.  I am pretty excited about doing this and have been whipping up a few extra things to demonstrate.  I will be showing some of these ideas to you over the upcoming week or so! 

First I want to show you what I did with some of my awesome old tie collection!  I was sitting on my craft room floor a few nights ago and spread all my awesome ties out in front of me.  I had no idea what I was going to do with them, but I knew that if I stared at them long enough, inspiration would EVENTUALLY strike!!  I was laying some of the co-ordinating ties by each other, thinking over some of the tie creations I had seen in the past - dresses, bags, skirts - and it hit me!!  A TABLE RUNNER!!  I picked my favourite colour combo and got started.  Husby thought I was nuts!  Here is what I ended up with.


Even husby liked it once I had finished it all off!  I am loving it too!  I think it's just fun and different and colourful.  Not to everyone's taste, but that's ok!  I'll be back soon with more fun stuff!

Christy

Tuesday, June 28, 2011

Bad blogger.

I have been slack and selfish.  I have been reading lots of blogs, finding new talented people to follow, taking note of their fabulous ideas, and not bothering to return the favour with producing regular eye candy on my blog haha!!  My apologies.  My attitude stinks towards anything that requires effort due to my ongoing health issues.  Poor health really does mess with you... sigh.

BUT onto brighter and happier things.  I have stuff to show you!

I made my husband some house shorts!  I was bored, and just went and got a pair of his basketball shorts out of his drawer, traced around them, and hoped for the best hahaha!!  They turned out pretty good considering.  After I finished sewing them (and after many a sigh and unpick and grunt) I had husby try them on and they only needed minor adjustments.  He's worn them pretty much every night since.  They're pretty funny if you ask me though!

(apologies for all the photos, they were taken on my phone as I seem to have temporarily misplaced my camera)
Then over the weekend I didn't have much on, so had a go at making another patchwork gypsy skirt.  I love how it turned out, even though I had a different idea in mind originally.  


I was able to overlock/serge all the edges before sewing my panels together.  After much grunting and sighing and unpicking, I was pleased that it came together nicely.  On a side not, I noticed something while I was cutting up my panels if fabric.  It was the writing on my selvage of the floral fabric.  It is cut off a little so isn't 100% clear, but I consulted my Facebook friends and they came up with a few other suggestions.....


I see "Fabric for Satan".  I laughed and laughed when I saw it.  Other suggestions were "Fabric by Sotan", "Fabric for Sotex".  I decided I'd stick with Satan for the entertainment factor.  What do you see??  

I had plenty of scraps and thought to make a nice headband to match also.

  
I was at my sisters house the other day and my sister insisted on practising her face painting skills on me.  I thought I'd show you for entertainment factor.  She asked why I wasn't terribly enthused.  My response was that it might have something to do with the fact that I am an adult....
And lastly, I have been doing some hairdressing jobs lately and have a nice bundle of cash waiting for me to spend on crafty goodness!!  I have been putting together a delicious Stampin Up order of punches and stamps... I can't wait!!
  
Until next time!

Christy

Friday, June 24, 2011

Front Door Decor

On my week off last week I had an urge to make my home look nicer.  I bought a new mirror for the entrance, I framed a picture of husby and I that was printed, hmm... 6 months ago?  Ooops!  Then I thought it would be nice to make something for my front door like all you Americans do :P  Afterall, husby is American and would probably appreciate it!! 


The frame was thrifted for a few dollars, and I got the letters from a craft store, I think the big one was about $3 and the littlies $1 each.  I needed to do about 10 coats of the paint to get the coverage I wanted on the frame.  Once I was happy with it, I smudged some brown paint over the wood markings and it gave it a more aged look, and then sprayed it with a sealant.  The small letters were simple.  Some white glue, some pretty scrapbooking paper, and some sand paper to tidy up the edges.  I attached them to the frame with some white glue... I hope it holds... I couldn't find the proper wood glue!  I actually sprayed the sealant over the small letters also.  Big mistake!  They left awful white cloudy patches on my letters.  I ended up sanding off the sealant and just painted over the top with some white glue to protect the paper against the weather.

Lastly was the F.  I just painted it up with white glue and wound and wound that gorgeous twine around it until it was all covered and I was happy with the design.  I coated the back of the F with white glue to secure all the string in it's place.  I noticed that some of the string shifted while moving it around.  The glue looked funny when it dried so I just did it on the back to secure everything.  I bought some hook and eyes and it hangs from the top of the frame.


For the string it hangs on, I just braided some ribbon and crafting rope and stapled it on the back.  You can't see the lovely colours of the braided ribbons and rope in this photo which is a shame.  And lastly, to make sure I didn't scratch up my front door with the staples at the top and with the frame, I stuck some of those sticky felt squares (that you put on the bottom of your chairs so they don't mark your tiles or wooden floors) all across the back of it.  They work a treat.  And husby doesn't mind it either :) 


Christy


Friday, June 17, 2011

Flowerpress Brooch Swap - what I made.

I took part in Flowerpress' Brooch Swap this month.  I haven't been lucky enough to receive my brooch yet but am still excitedly anticipating it's arrival soon :)  I did a sneak peak of the brooch I made a few weeks ago.  Figured it was time to show you the whole thing!  It wasn't the most complicated intricate brooch to make, but my swap partner is so bright and positive and I know she has a love for buttons, so I thought it would be fitting to do a rainbow button brooch. 


I hope she likes it and I hope it got to her safely! 


Christy

Tuesday, June 14, 2011

Celebrations & promotions

I've been busy listing in my Craftumi store again today.  I'm really excited to be on top of things in my neck of the woods.  I haven't been this organised in a while.  I also have a reason to celebrate.  I am up to 90 followers!!  I am super excited about this.  Welcome to my new followers, and thank you for all those who have been sticking around for quite some time now!!  I appreciate you all!

Here's a sneak of what slipped into the store this morning...


So to celebrate my organization and awesome followers, I decided to do a little promotion!  For the remainder of the month of June, if you make any purchase in my Craftumi store, or Madeit store, I will send you an extra thank you gift for your support.  All you need to do is tell me in the notes that you are a follower of my blog (and be a follower of course).  I bet you want to know what the thank you gift is don't you?  Well folks, that part I am going to keep a secret!  You'll just have to wait and find out when you receive your little parcel in the mail!!

Hope everyone is having a delightful day! 


Christy

Monday, June 13, 2011

Weekend Craft & Listings

I've had a super productive weekend in my craft room which makes me super happy!  It's been refreshing to spend so much time in here.  I sewed a patchwork gypsy skirt for myself some time ago.  I decided yesterday I needed to make myself another!  Now this is a skirt pattern which I drafted myself and have no instructions.  I thought it would be best to practice on a smaller scale first, and I made a child's skirt. 


It turned out well, and I have started selecting the fabrics for my new skirt.  I hope to make a start on it this week.  I am excited that I will be able to overlock/serge all of the edges before sewing it together this time around.  Santa Clause was so kind to me last year :)

Today the sun was shining, for the first time in about a week so I took advantage of it and took some pictures of goodies to go into my Madeit store and Craftumi store outside on the back patio.  I spent the afternoon editing and listing.  Here's a sneak of some of the things that made it in there.


And tonight I have been busy photographing, packaging and I'm just about to start editing to list a bunch of awesome stuff into my Craftumi store.  Die cuts, punchies, and cool stuff like that.  It feels great to have been so productive today!!  

What did you do today?  Anything productive?  Or did you relax and enjoy the sunshine?


Christy

Sunday, June 12, 2011

I love getting parcels in the mail...

I got into work on Wednesday last week, and sitting on my desk, was a beautiful parcel.  It was addressed to me.  This can only mean fabulous things.  I look on the back to see who it's from, and instantly know what it is...


It's an awesome gigantor pincushion from Wendy over at The Textured Leaf.  I won a giveaway on her blog a little while back, and she sent me a pincushion as my prize.... except, it went a missing in the post!!!  So she kindly made me another and has sent it over.  Thanks so much Wendy, I love it and already have it in use!


The funny thing is, when I was transferring my pins over to my new pincushion, I started squeezing my old thinner pincushion incase any needles were living inside.  I popped 12 out.  I was starting to run low on needles and was worried they might have been hiding in my carpet, ready to strike at a passerby foot.  But, they were tucked away safely in my pincushion.  Needless to say, I won't be putting any needles on my new pincushion... I would never see them again if they snuck inside!

Christy

Thursday, June 9, 2011

Floral this, doily that.

Over the past few weeks I've been making bits and pieces at my own leisure.  It seems I have a little catching up to do on my blog since I have been unwell this past week!!  Around two months ago I had fun making a couple of pretty headbands for myself, which you can read about here and here

I love doilies, so thought it would be worth trying to create something for my hair using them.  This is what I came up with. 


I absolutely love it, but know doilies aren't for everyone.  Which is why I was SUPER surprised when I wore it to church one week and I lost count how many compliments I got about it.  I was super excited!  This of course got me thinking about the possibilities of doily headbands.  Here is what I've come up with so far.


I'm working towards popping them in my shop in the next day or so.

And while we're on the subject of doilies...  remember this table runner?


It's making it's way into the shop too!!  I'm excited!!

And last but not least.  My new favourite fabric flower!  I have been making a couple more out of gorgeous vintage fabrics and am undecided whether to make these two hair clips or brooches.  What do you think?


This one I made into a brooch and absolutely adore.  It's made from a gorgeous soft grey velvet and musk pink corduroy.  I LOVE it!!  I'll be popping it into the shop soon also.


So what have you all been up to this past week?  I am on holidays next week and SO looking forward to being able to spend more time in my 'quaint' craft room!  Hope everyone is avoiding the horrible colds, flu's and tummy bugs going around, and staying WARM!!!  Brrrr!!!


Christy

Tuesday, June 7, 2011

I'm sick!

Image
This is me!  Tummy bugs and a never-ending cold are playing havoc on my ability to achieve much of anything of late.  Haven't been able to create anything this week to share with you, sorry!  Hopefully I am back on my feet soon... I don't have much patience for ill health.  Hope you all are staying cold/flu/tummy bug free!!

One last thing.  After a horrible night last night of being so ill that I couldn't sleep, I went out today and bought an array of things to help me feel better, along with a 2 litre bottle of Sprite.  Sprite is the one thing that makes me feel better!  
What makes you feel better when you're sick??

Christy

Thursday, June 2, 2011

My Creative Space - Just a few things I whipped up...

I have been feeling under the weather, and haven't been doing too much crafting this week.  But last night I had the craft bug and got around to trying out this fantastic tutorial which has been open on my browser for a few weeks now!!

My first attempt:


And my second attempt:
The first one looked too spaced out, so I sewed the petals closer together with the white lace one, which I think looks much nicer.  

Link in here for more spaces.


Christy

Tuesday, May 31, 2011

Brooch Swap Sneak

I was super organised and made my brooch and sent it off a week ago.  I wasn't going to reveal anything until my partner had received it and posted about it, but I figured a itty bitty sneak wouldn't hurt!!


Christy

Monday, May 30, 2011

Perusing

I haven't been much in the mood to blog lately.  Main contributor being stress!  So I've taken a step back, and have REALLY been enjoying reading other's blogs with more intent.  I've also had some fun finding new blogs to follow.  I know we all say this, and often, but GEEZ there are some clever people out there.  So today, my blog post isn't full of gorgeous things I've made (even though I really do have a tonne of things I want to show you all), but it is full of things that have been making me smile, and feel inspired.  Hope you enjoy them as much as I did.

Foxs Lane - Kate, you're never too old to wear twirly skirts.

Raspberry Rainbow - Cat, thanks for making me feel normal about the miracle of the bottom of the laundry basket.  And I hope your roof attaches itself back where it belongs soon.

Creating My Way To Success - Jill, I'm amazed at your determination to empty that box of potential upcycles.  AWESOME.  I must follow your lead.

Made - Dana responded to my comment about her haircut, even though I was the 171st comment.  Some people are just too nice.

Little Poppa & Me - Tammi is on the move, and everyone knows how fun it isn't!  That will be me in another month or so.  You can do it Tammi!

Flowerpress - I sent off my brooch, for the brooch swap last week.  I can't wait to receive mine.  You can check out other's ideas and creations over at the Flickr group.

Made By Me. Shared With You - Tricia has an amazing ability to make something as simple as a blanket look so amazing.

Blueberry Patch - Cathy's post made me laugh.  Chickens are always good for entertainment.

Thea & Sami - Thea has found a pair of the most amazing hand warmers ever.  And she held an awesome fundraiser morning tea last week!

Seven Cherubs - Naomi gave me a good idea, to have a Daddy Baby Shower.  Although I think I still might want my own too.

Totally Tutorials - thanks for posting this tutorial, which led me to this blog, and this great tutorial.  I'll be trying my hand at it soon.

Rosa's Room - Karlyn, thanks for reminding me how hilarious kids are sometimes.

And Then There Were Four - Multiple Mum, thanks for saying it how it is

and finally,

Flower Photography - V, thanks for making everyday things look beautiful.

Hope you've enjoyed a good read!!


Christy